Creating Your First Artboard in Sketch
At the end of this topic you'll have a Sketch Artboard for a registration screen using the Indigo.Design System. If you use Adobe XD for design, then jump to this topic. If you use Figma for design, then jump to this topic.

What you need
If the Titillium Web Font isn't installed on your computer, please do it before starting. All texts in the Indigo.Design System use it.
Step by step
1. Add the Indigo.Design System as a Library.
Download the Indigo.Design System.
It contains a Sketch file with 26 Pages in the Pages section which are distinguished by three types of icons:
🎨 ~ styling pages: all the styling assets such as Material Icons, Colors, Typography, Elevation, and Illustrations can be found in the five pages on top.
🧩 Components page: a vast set of Components to layout your design ideas. Through various presets available in the
Insertmenu and overrides for states and layouts to configure in the right panel of the Sketch UI, you can create layouts compatible with Ignite UI for Angular and our code generation engine.🌆 ~ patterns pages: the components shape up meaningful patterns for productive application design that can be found spread across the remaining pages.
Open up the Sketch app on your Mac, click on the Sketch in the App Menu, and select Preferences.
In the dialog, select the
Librariestab and click the Add Library... button.Navigate to the folder where you have downloaded the library.
Select it and click
Open.Make sure it shows up in the list in the
Preferencesdialog and that it is checked.
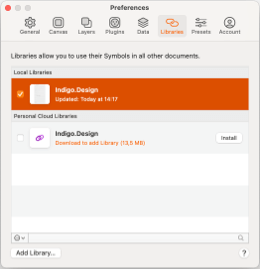
You may have noticed that in the image above, the library also appears to be present in my Sketch cloud, and as an alternative, you can use this mechanism if you are running version 57 or later. The set up is very easy, you only need to open the Indigo.Design Sketch file and save it in your Sketch cloud. A detailed explanation of how to set Indigo.Design as a cloud library can be found in this Medium post. Once you added the library successfully, it will show up in the Symbols section of the Insert menu.
Note
If you already have the Indigo.Design System set up in Sketch and want upgrade to a newer version, open your Sketch preferences, delete the current library and install the new one following the steps above. Make sure to reapply any themes and customizations via the Indigo.Design plugin and note that you may have to link some components or overrides in your design files manually to the symbols in the new library if Sketch does not do that automatically for you.
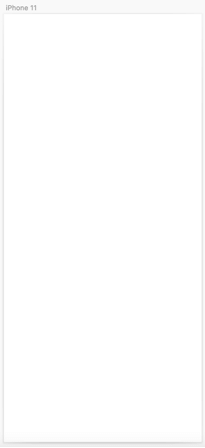
2. Create an artboard.
- In the Sketch app on your Mac, create a new file.
- Select the Artboard size.
Press theAkey and select the artboard size from the panel on the right.
This example is for an iPhone 11 in portrait orientation (414x896). If you don't see this preset artboard, choose Apple Devices from the dropdown at the top of the panel.
3. Add and customize components.
We will use the Insert menu to add components from the Indigo Design Library, and then customize them using the panel on the right.
Warning
Symbols and components designated as _Overrides must not be inserted on artboards as they provide component states and do not represent a complete component by itself.
These are the steps to recreate the screen in the example.
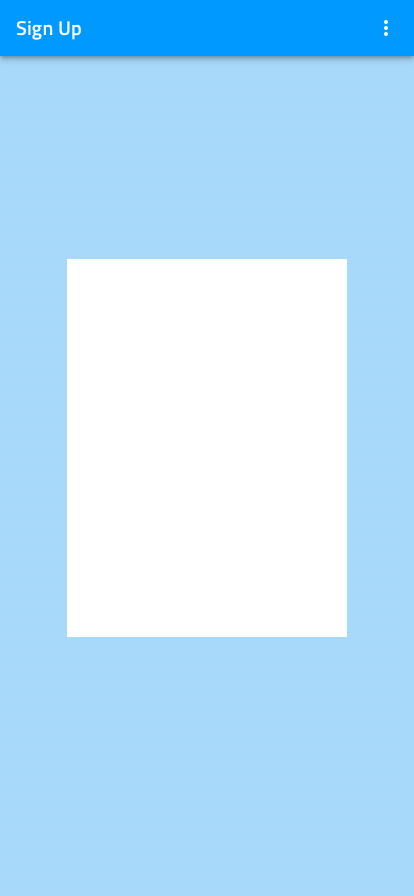
Add the Navbar.
- From the
Insertmenu, select Symbols / Indigo.Design / Navigation / Navbar / Elevated. - Place it at the top of the artboard and stretch it to take up all the width available.
- In the Resizing section of the panel on the right, pin it to the top of the artboard and fix its height.
- In the Overrides section, set the Left Action to ~No Symbol, then set the Title to "Sign Up". After that set the 1 | Icon, 2 | Icon, and 3 | Icon to ~No Symbol.

- From the
Add the background color.
Press theRkey and drag а rectangular shape, making sure it's sized accordingly to fill the available area below the Navbar and is also under it as a layer. With the rectangle selected, in the right panel under Appearance you will find a Layer Style dropdown. Open it and choose Indigo.Design / Color / Fill / primary.100.
Add the background for the form.
- Press the
Rkey again and drag а rectangular shape with size 280x378. - Assign the following style to it Indigo.Design / Color / Fill / white.
- Position it in the center of the artboard.
- Press the
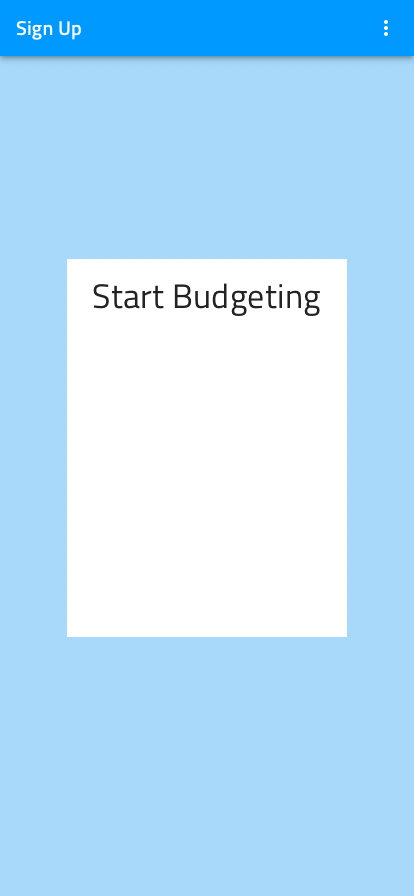
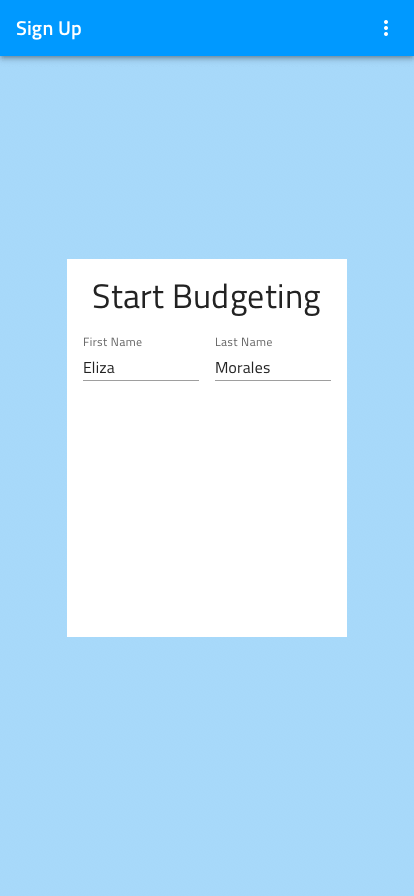
Add the title of the form.
- Press the
Tkey to add a text element on top of the white rectangle and type "Start Budgeting" in it. - Assign the following typography style to it similarly to how a color was assigned to a rectangle above but under Appearance you will find a Text Style dropdown. Open it and choose Indigo.Design / H4 Headline / Center / Active.
- Place it at the top of the white rectangle, with 16px spacing on the top.
- Press the
Add the inputs for first and last name.
- From the
Insertmenu, select Symbols / Indigo.Design / Input / Simple / Line / Enabled. - In the Overrides section, set the State to ~Filled.
- Set the Prefix Container and the Suffix Container to ~No Symbol.
- Set the Label to "First Name", and the Value to "Eliza".
- Place it below the title. Leave 16px on the left and top.
- Set its width to 116px.
- Duplicate this input.
- Place the new one to the right of the first one, with 16px spacing between the two.
- In the Overrides section, set the Label to "Last Name", and the Value to "Morales".
- From the
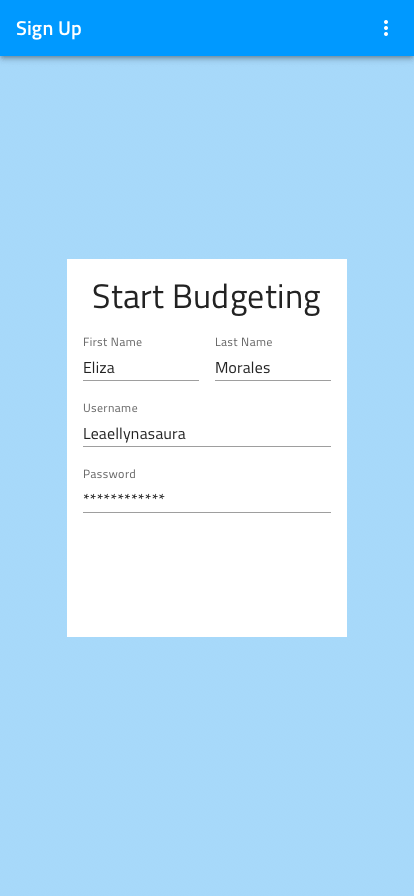
Add the inputs for user name and password.
- Duplicate one of the Name inputs twice to create two more inputs for Username and Password.
- Place them one under the other with a vertical spacing of 16px between each other and to the ones from the previous step.
- Stretch them across the full width with 16px spacing on both sides.
- In the Overrides section, set their Labels to "Username" and "Password" and their Values to "Leaellynasaura" and "************".
- While there also set the Password input's Content Type to Password.
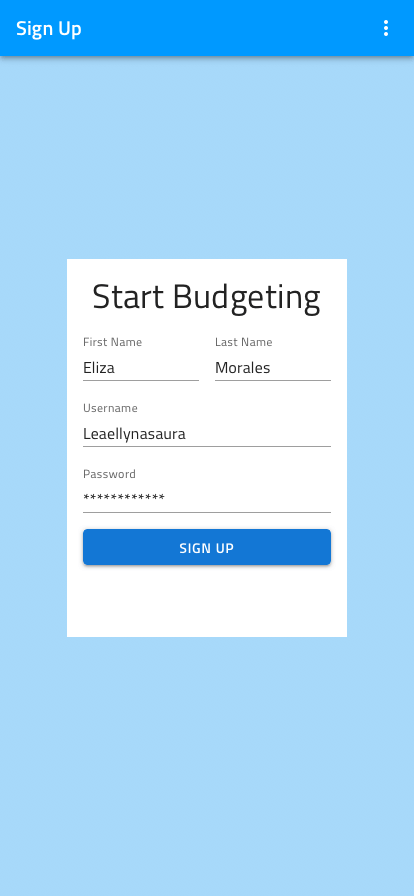
Add the sign up button.
- From the
Insertmenu, select Symbols / Indigo.Design / Button / Contained / Enabled. - Place it below the inputs, stretch it across the full width leaving 16px on the left, right, and from the inputs above.
- In the Overrides section, set the Before Icon and the After Icon to ~No Symbol.
- Set the Text to "SIGN UP" and update its Style to ~White.
- Update the Background to ~info.
- From the
Add the terms acceptance text.
- Press the
Tkey to add another text element below the button and type "By clicking on the "SIGN UP" button above, you accept our Terms of Use" in it. - Assign the following Style to it Indigo.Design / Caption / Center / Inactive.
- Change its size so that there is a 16px spacing on the left, right and above.
- Press the
Make the artboard responsive.
- Select the text layers, inputs, button and white rectangle, and group them.
- Fix the width and height of the group and pin it to the top from the Resizing options in the panel on the right.
Additional Resources
Related topics:
Our community is active and always welcoming to new ideas.
 GitHub